Fun with Domain Controllers Part 1 – Using the set spn command after a Double-Take failback.

From Microsoft:

In Active Directory, the servicePrincipalName (SPN) attribute is a multivalued, nonlinked attribute that is built from the DNS host name. The SPN is used in the process of mutual authentication between the client and the server hosting a particular service. The client finds a computer account based on the SPN of the service to which it is trying to connect.

Setspn.exe: Manipulate Service Principal Names for Accounts

This command-line tool allows you to read, modify, and delete the Service Principal Names (SPN) directory property for an Active Directory service account. SPNs are used to locate a target principal name for running a service. You can use Setspn to view the current SPNs, reset the account’s default SPNs, and add or delete supplemental SPNs.

This post details when you have to use this command following a Double-Take fail back.  Last week I was testing Double Take fail over software for virtual systems.  In the test senario, we had configured two sites across a WAN link to use seperate domain controllers.  Failover worked without a hitch, but when we attempted to fail back the virtual machine (in this case a SQL64 box) on the primary site refused to authenticate on the domain controller of the same site.  Double-Take technical support indicated the issue was one of replication, and since the sites were separated by a few thousand miles, that replication might take some time.  I had already been on the job for over 12 hours and was ready to go home, so this is what I did to speed up the process:
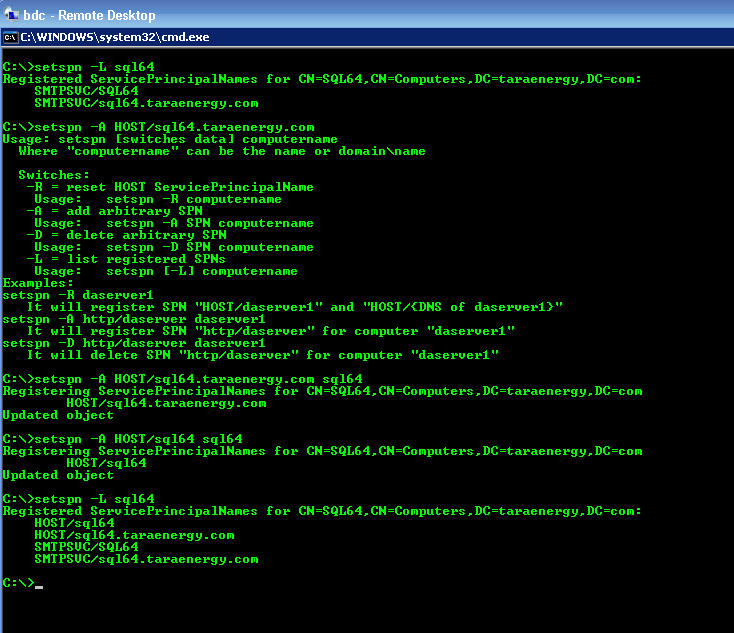
Screen Shot from Remote Desktop Console

Screen Shot from Remote Desktop Console

Rename a VMDK file in VMware’s ESX server.

A vmdk file is a VMware Virtual Disk file. This is the file used by VMware ESX server that represents a hard drive on a virtual machine.

Renaming a vmdk file is not as simple as opening the datastore viewer, right click and rename. No, that would be too easy. To do it, you have to break out the SSH session. Ready for command line??

How to do it:
Open a putty session to your ESX server, type in the username and password, and get ready to enter the following commands:

cd /vmfs/volumes/STORAGENAME/VMNAME [Enter]
ls [Enter] (Optional – to see what your working on.)
mv OLDNAME.vmdk NEWNAME.vmdk [Enter]
mv OLDNAME-flat.vmdk NEWNAME-flat.vmdk [Enter]

This basically moves the vmdk and in the process renames it.
This next part is what makes the whole thing work, so pay close attention.

type vi NEWNAME.vmdk
This brings up a “New Screen”. Hit the down arrow till you get to the line that starts with RW, then hit the right arrow key till you get to OLDNAME.vmdk. Youll want to change OLDNAME.vmdk to NEWNAME.vmdk. Position your curser on the 1st Quote and hit “A”. Edit the OLDNAME like normal, then hit Esc.

Once finnished type :wq [Enter]

Thats it!

You can type ls if you want to check to make sure the change was successfull, but is not necessary.

Another Method:
In a SSH session type the following commands:
cd /vmfs/volumes/STORAGENAME/VMNAME [Enter]
vmkfstools -E ./OLDNAME.vmdk ./NEWNAME.vmdk [Enter]

Keeping your SAN free of clutter when deleting VM’s in VMWare ESX.

The process for deleting VM’s and removing them from your SAn is quite simple, but what you may not know is that the simple way will leave all kinds of remmants, and orphaned files still sitting on your SAN.  In this post I will detail everything you need to keep your SAN clean and free of these left over space takers.

1. Delete all snapshots:  To delete snapshots for a selected VM, start by logging into your Virtual Infrastructure Client and viewing your inventory.  Highlighting the VM and then right click to bring up the drop down menu.  Select “snapshot” then “snapshot manager”.  Highlight your snapshot (or snapshots) and select “delete all”.  You should get a pop up box that says, ” This will consolidate and remove all snapshots for this virtual machine.  All the snapshots will be consolidated to a single disk. Are you sure you want to do this?” Select “Yes” and your snapshots will be deleted.

2. Delete and remove your VM from the SAN: To do this simply right click on the VM and select “Delete from disk”.  You will get the warning pop up with the “are you sure?” message.  Select “Yes” and your VM will be deleted and removed from the SAN.  (You will see the “Destroy Virtual Machine” message followed by the percentage to finish in the recent tasks box at the bottom of the screen.)

3. Clean up those orphaned and left over files, as well as the directory name from your SAN:  For this you are gonna want to putty to your host and issue the following commands after logging in as root (see pictures below). Continue reading »

VMWare ESX Server Admin Tips (What they don’t teach you in class!)

Unless you happen to be the developer, or involved in the code writing process it is rare that you will learn all the “undocumented features” of any given software.  Such is the case for myself and one of the techs I manage involving VMWare’s ESX server product.  The company we work for went completely virtual last year, and we were left with the headache of managing the new non-physical server farm and all it’s various issues.  We both attended an instructor led VMware ESX admin class at Global Knowledge (given by VMWare) and have now worked with the product for a little over a year, yet we constantly find new ways to do routine maintenance tasks, and solutions to problems that are not covered in any class.  In many cases we have discovered solutions that even Tech Support at VMware didn’t know about, or at the very least the lower level techs didn’t know about.  Below are some TIPS we have discovered that we learned outside the classroom environment.  Hopefully any of you reading these can be saved the time and effort we went through to find them.

Tip 1: Transfer files from server to your local machine.
You can use the SFTP protocol to connect to the ESX datastore. WinSCP was the 1st SFTP client I used to connect to our datastore, but later an awesome VMware tech (rare) told me about FastSCP. An SFTP client which was specifically designed to work with ESX server, and increases the transfer speed 10 fold. Think of BitTorrent for ESX Server. You can use this to transfer files between servers and your local machine for what ever reason. Continue reading »

Becoming a GACP (Google AdWords Certified Professional) Seminars for Success

I’m breaking up my “Becoming a GACP….” post to write about my experience attending the Seminars for Success – Google Web Optimizer one day course.  I really wanted to attend the two day Google Analytics seminars, but I had a personal commitment on the second day, so I decided to sit those out.

The seminar was very informative and well worth the $250 bucks I paid for it.  It gave a great deal of information on using Google’s Web Optimizer for landing page testing, as well as showing you how to go about inserting the code into your website, and teaching you how to inertput the results of the test, and make the changes you need to increase conversion rates.  The seminar also covered a great deal about best practices for setting up landing pages, the psycology of selling on the net, and ways to tweek your landing pages for optimal click through.

These are the notes I took, but I was only able to keep up until they hit the coding section.  Once they hit the coding section, they pretty much followed exactly what they gave us in slides, so I have omitted that section.  The rest of my notes are below. Continue reading »

Becoming a GACP (Google AdWords Certified Professional) Part 1

I have discussed becoming a GACP (Google AdWords Certified Professional) in a previous post, so feel free to check it out.  I have decided that I am committed to adding this certification to my resume and have started watching the videos in the Google Learning Center.

I have finished the first section and for the most part it was pretty strait forward… until it got to the section on calculating the actual amount you have to pay per click based on your minumum and maximum bids per keyword.  I had to watch that one video section at least 5 times to fully get a grasp on the pay model.  All formulas and math asside, the bottom line is that the amount you “actually” have to pay is largely determined by a “Quality Score” variable that google assigns you that A. you have no control over, and B. is never actually shown to you.

So bottom line is that Google does what it wants, and you really have no control of how the system assigns you a price per key word.  The only thing that saves you is that you can set a budget so you don’t have to pay more than you can afford.  Obviously, if the advertising works, then your gonna pay what ever the price is, so long as you can still turn a profit, but that’s what happens when one player has control over 80% of the market.

Anyway, below are my notes on the “Introduction To Adwords” with the most difficult of the video lessons at the very bottom. Continue reading »

Cleaning up your Exchange Mail Store!

I was recently tasked with cleaning up an exchange mail store that was nearing the 75 GB limit for the Exchange 2003 server it was being used on.  (In actually, the mail store was 45GB and the public folder store was 26GB putting the total for the store near 71GB.)  The event log indicated that Exchange 03 didn’t like the fact that the mail store was reaching it’s limit and was complaining via a periodic mounting and dismounting of the mail store.

After quick review of the companies employee rouster, it occured to me that over half the employees with mailboxes were no longer with the company, and no longer recieving mail. OK, so what needed to be done was to backup (remove) the mailboxes not in use, and then defragment the mailstore to clean up all the “white space” in the database.  (Note: just deleting the mailboxes will not create more space in the exchange mail store database due to the way “single instance storage” works in exchange, so you have to perform a defragment manually.)

Here’s how it went down: Continue reading »

How to change the default location for the “My Documents” folder.

To change the default location of the My Documents folder, follow these steps:

1. Click Start, and then point to My Documents.
2. Right-click My Documents, and then click Properties.
3. Click the Target tab.
4. In the Target box, do one of the following:
* Type the path to the folder location that you want, and then click OK. For example, D:\My Stuff.

If the folder does not exist, the Create Message dialog box is displayed. Click Yes to create the folder, and then click OK.

-or-
* Click Move, click the folder in which to store your documents, and then click OK twice.

If you need to create a new folder, click Make New Folder. Type a name for the folder, and then click OK twice. Continue reading »

Forcing a Time Sync to your Domain Controllers.

Last week immediately following the time shift for “daylight savings” we noticed our Primary Domain Controler (PDC) and our Backup Domain Controler (BDC) had a time difference of greater than 30 mins.  This was not caused by the time shift, but something we discovered while checking to see if our infrastructure had updated the time properly.

Below is a method to resync them.

Check the system date and time on every DC to find the wrong one. Use net time to synchronize time between DCsb then run gpupdate and everything will be alright.

Open a command prompt window and type in:

net time /setsntp:us.pool.ntp.org

You can replace us.pool.ntp.org with what ever NTP server you wish to use.

0.pool.ntp.org
1.pool.ntp.org

are just a couple other examples.

Once finnished, type gpupdate and you should be good to go.

DO NOT FORGET: Check your bios time/date/timezone. It may be affecting it.

How to convert your Domain Profile to a Local Profile.

This is useful when you have been doing consultant work on your own laptop, while joined to a clients domain, and you wish to leave said company while still retaining all the work and setting you had while joined to their domain.

I’ve found doing a manual transfer to be more reliable then using the inbuilt profile copy (the one where you go into profiles and right click copy) and personally i haven found USMT (user state migration tool) to miss stuff or just totally screw up the new profile.

To manually copy the profile over here are the steps. Continue reading »